Spring Boot is the most popular application framework out there. This guide provides best practices to help test your Spring Boot applications!
What is Spring Boot?
Spring Boot is a convention-oriented, opinionated addition to the Spring platform used to create standalone production-grade Spring-based applications that you can “just run”. Most often Spring Boot is used for creating service backend applications such as REST backends.
🌱 Introduction to Spring Boot
Read our all-in-one guide to the basics of Spring Boot.
Not sure if Spring Boot is what you need? Here’s our post comparing Spring vs Spring Boot vs Spring Web MVC vs Spring WebFlux.
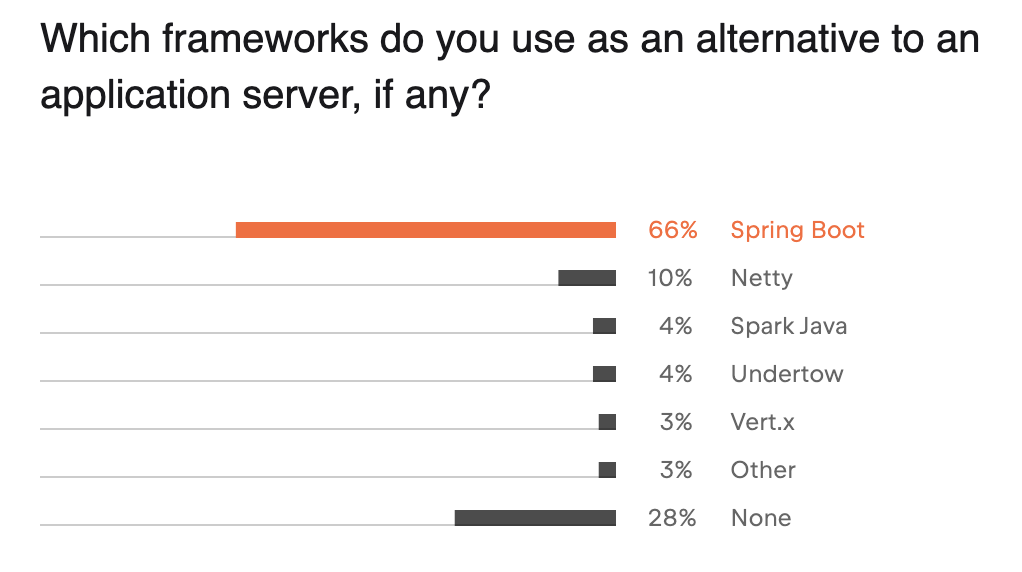
Spring Boot is so popular (used by 66% of developers) because it offers a low-effort way to get started with creating applications.

Besides creating applications, it also makes testing easier: tests for Spring Boot are commonly created using JUnit 5 (but you can also test Spring Boot applications with JUnit 4 or other test frameworks), and Spring Boot offers some special annotations to facilitate testing. This post covers the basics of testing in this popular application framework, and provides some best practices that will make your testing in Spring Boot simple and efficient.
git clone https://github.com/spring-projects/spring-petclinic.git to check out the “Petclinic” repository.We’ll be looking at three main Spring Boot testing scenarios:
- Unit testing Spring Boot applications
- Integration testing in Spring Boot using test slices
- Testing the entire application with
@SpringBootTest
How to unit test Spring Boot applications? Best practices for Spring Boot testing
You’ll use unit tests (as opposed to integration tests) if your goal is to test a portion of the application in isolation from all other components. In case you’re looking to test a piece of code that does not rely on any Spring Boot objects, you actually won’t need to use specific Spring Boot tests.
Setting up a Spring Boot application context can take considerable time, which makes the execution of unit tests take unnecessarily long. In such cases (e.g. when no Spring Boot objects are used in your code), just go with the most simple solution: use a plain JUnit test. There’s no need to write Spring Boot specific tests every time.
Here’s an example of a plain JUnit test within the “Petclinic” example to give you an idea. This one tests the class Vet, which has no dependencies to Spring objects. In this case, the best way to go is to write a simple unit test:
class VetTests {
	@Test
	void testSerialization() {
		Vet vet = new Vet();
		vet.setFirstName("Zaphod");
		vet.setLastName("Beeblebrox");
		vet.setId(123);
		Vet other = (Vet) SerializationUtils.deserialize(SerializationUtils.serialize(vet));
		assertThat(other.getFirstName()).isEqualTo(vet.getFirstName());
		assertThat(other.getLastName()).isEqualTo(vet.getLastName());
		assertThat(other.getId()).isEqualTo(vet.getId());
	}
}
If you want to add another test to, for instance, test the getNrOfSpecialties method of the class Vet, you could simply use Symflower to generate a test template with the necessary objects and assertions already set up for you:
@Test
public void getNrOfSpecialties() {
	Vet v = new Vet();
	int expected = 123;
	int actual = v.getNrOfSpecialties();

	assertEquals(expected, actual);
}

How to integration test Spring Boot applications using test slices?
If you’re looking to test specific parts of your application in isolation (e.g. without the web UI or database), you’re actually aiming to do integration testing. To do integration testing in Spring Boot, you’ll need to set up a Spring application context with all the dependency components relevant for your tests. That’s what Spring Boot’s test slices help you do. Using test slices lets you create a Spring context by applying specific auto-configurations to only load the subset of dependency components that are relevant for your integration tests.
Since this makes testing faster by saving resources, it’s a best practice to rely on test slices rather than @SpringBootTest, which is used to test larger portions or the entire application (see the next section for more details).
Some of the most important test slice annotations are @WebMvcTest (for testing Spring MVC components), @DataJpaTest (for testing JPA components), and @WebFluxTest (for testing Spring WebFlux components).
A range of other annotations are available, including:
@DataLdapTest: Use for LDAP tests that focus solely on LDAP components.@DataMongoTest: Use this annotation for MongoDB tests that focus on MongoDB components only.@DataRedisTest: Used for Redis tests focusing only on Redis components.@JooqTest: This annotation is for a jOOQ (Object Oriented Querying) test that concentrates on jOOQ-based components exclusively. jOOQ is a widely used database library which enables you to write type-safe SQL queries in Java.@JsonTest: Used this annotation for JSON tests that concentrate on JSON serialization only.@RestClientTest: Used for Spring REST client tests that focus only on components that use RestTemplateBuilder.
🤔 Spring Web MVC or Spring WebFlux?
Unsure which one you should choose? Read our comparison of Spring Web MVC and Spring WebFlux!
How to test web controllers in Spring Boot using @WebMvcTest?
Spring provides a specific annotation for testing web controllers if you’re looking to test REST APIs without the server part running. If you’re looking to test the integration between the controller and the HTTP layer, you’ll use the @WebMvcTest annotation to test Spring MVC parts of your application and @Autowire all the components you need for your test from the application context.
😳 Wondering about the differences between @Controller vs @RestController in Spring Boot?
Read our comparison and detailed guide to @Controller vs @RestController in Spring Boot.
@WebMvcTest will auto-configure the Spring MVC infrastructure needed for your test. Just use @MockBean to mock the business logic, since that’s not what we’re interested in when testing web controllers.
So what does @WebMvcTest include? When using this annotation, your Spring Context will include the necessary components for testing the Spring MVC parts of your app: @Controller, @ControllerAdvice, @JsonComponent, Converter, Filter, WebMvcConfigurer, GenericConverter, and HandlerMethodArgumentResolver. Note that the following are not part of the Spring test context when using @WebMvcTest: @Service, @Component, and @Repository components (aka beans)!
An example of a @WebMvcTest can be found here: src/test/java/org/springframework/samples/petclinic/owner/OwnerControllerTests.java. It tests a @Controller to update information of a pet Owner. Here’s an excerpt of the @WebMvcTest used here:
@WebMvcTest(OwnerController.class)
class OwnerControllerTests {
	@Autowired
	private MockMvc mockMvc;

	@MockBean
	private OwnerRepository owners;

	@Test
	void testProcessUpdateOwnerFormSuccess() throws Exception {
		mockMvc
			.perform(post("/owners/{ownerId}/edit", TEST_OWNER_ID)
				.param("firstName", "Joe")
				.param("lastName", "Bloggs")
				.param("address", "123 Caramel Street")
				.param("city", "London")
				.param("telephone", "01616291589"))
			.andExpect(status().is3xxRedirection())
			.andExpect(view().name("redirect:/owners/{ownerId}"));
	}
}
First, the @WebMvcTest annotation is used to define a WebMvcTest. The only parameter to this annotation defines the controller under test (i.e. the OwnerController).
The controller under test, OwnerController, relies on the single repository OwnerRepository which is auto-wired within the Test class implementation. The mockMvc is the main entry point for server-side Spring MVC test support and is used to perform REST operations. Take a look at testProcessUpdateOwnerFormSuccess which shows how to write a test for a post operation on the OwnerController.
For some valuable help around testing, check out Symflower, a smart IDE app that lets you generate test templates for Spring Boot. The generated templates will contain the auto-wired portions for mockMvc and all required dependency components. A test body auto-generated by Symflower for processUpdateOwnerForm looks as follows, requiring only some adaptations to fit the intended purpose:
@Test
public void processUpdateOwnerForm() throws Exception {
	this.mockMvc.perform(post("/owners/{ownerId}/edit", 123)
			.param("id", "<value>")
			.param("firstName", "<value>")
			.param("lastName", "<value>")
			.param("address", "<value>")
			.param("city", "<value>")
			.param("telephone", "<value>")
			.param("pets", "<value>"))
		.andExpect(status().isOk())
		.andExpect(view().name(""))
		.andExpect(content().string(""));
}
Generating the template is very simple:
How to test database queries in Spring Boot using @DataJpaTest?
To test the interaction between your application and the database, you can either use the @DataJpaTest annotation or @DataJdbcTest. In this case, we’ll be looking at @DataJpaTest as it is more generally applicable. JPA is database-agnostic, which enables you to use your scripts in a range of databases. JDBC, on the other hand, is database-dependent, meaning that you’ll have to write different code for different databases.
@DataJpaTest serves to test any components of your app related to JPA (the Jakarta Persistence API). This annotation provides an easy way to set up an environment with an embedded database that you can test your queries against. The application context created by this annotation only contains the “slice” of the context that is required to initialize JPA-related components such as a Spring data repository. With @DataJpaTest, only @Repository Spring components are loaded. Ignoring other components like @Service or @Controller improves the performance of your tests.
To test database queries, you’ll need to know the following:
- Our running example of “Petclinic” defines databases under
src/main/resources/db - The default database is h2, which is an in-memory database. Find the database schema definition here:
src/main/resources/db/h2/schema.sqland the data to prefill the database undersrc/main/resources/db/h2/data.sql. - The
owners table is used to store data about owners like their first name, last name and address. Note that theownerstable contains two entries with the last nameDavis. - For an example of
@DataJpaTest, check outsrc/test/java/org/springframework/samples/petclinic/service/ClinicServiceTests.java.
The following test shows a DataJpaTest which makes sure that retrieving owners by their last name actually works. Indeed, two owners with the last name ‘Davis' are found:
@DataJpaTest(includeFilters = @ComponentScan.Filter(Service.class))
// Ensure that if the mysql profile is active we connect to the real database:
@AutoConfigureTestDatabase(replace = Replace.NONE)
// @TestPropertySource("/application-postgres.properties")
class ClinicServiceTests {
	@Autowired
	protected OwnerRepository owners;

	@Autowired
	protected VetRepository vets;

	Pageable pageable;

	@Test
	void shouldFindOwnersByLastName() {
		Page<Owner> owners = this.owners.findByLastName("Davis", pageable);
		assertThat(owners).hasSize(2);

		owners = this.owners.findByLastName("Daviss", pageable);
		assertThat(owners).isEmpty();
}
}
How to test the entire Spring Boot application with @SpringBootTest?
As long as you’re only testing certain parts of your application, you should rely on the test slices outlined above to save time. If the scope of test slices isn’t enough because you’re looking to test larger portions or the entire application, you’ll use @SpringBootTest for integration tests that cover all layers of the application.
This annotation will start the entire Spring application context similar to what would be loaded in a production environment. Spring Boot offers tons of auto-configurations to customize the application context created by @SpringBootTest by adding new components to it. See the documentation for more info.
To limit which classes are loaded, define them as a list with the annotation, e.g:
@SpringBootTest(classes = {ClassToLoad1.class, ClassToLoad2.class})
Our “petclinic” example uses @SpringBootTest to test MySQL as well as PostgreSQL integrations:
src/test/java/org/springframework/samples/petclinic/MySqlIntegrationTests.javasrc/test/java/org/springframework/samples/petclinic/PostgresIntegrationTests.javaEach of these will set the respective profile to use either PostgreSQL or MySQL.- Finally, the system test for the pet clinic can be found under
src/test/java/org/springframework/samples/petclinic/PetClinicIntegrationTests.java.
@SpringBootTest(webEnvironment = WebEnvironment.RANDOM_PORT)
public class PetClinicIntegrationTests {
	@LocalServerPort
	int port;

	@Autowired
	private VetRepository vets;

	@Autowired
	private RestTemplateBuilder builder;

	@Test
	void testOwnerDetails() {
		RestTemplate template = builder.rootUri("http://localhost:" + port).build();
		ResponseEntity<String> result = template.exchange(RequestEntity.get("/owners/1").build(), String.class);
		assertThat(result.getStatusCode()).isEqualTo(HttpStatus.OK);
	}

	public static void main(String[] args) {
		SpringApplication.run(PetClinicApplication.class, args);
	}
}
Summary: how to test with Spring Boot?
So that covers the basics of testing Spring Boot applications on the 3 key levels of testing. As a summary, remember the following key takeaways:
- Use unit tests wherever possible. If no Spring Boot objects are affected, rely on unit tests to save testing time, resources, as well as making tests easier to write and maintain.
- Rely on test slices for integration testing whenever you can to only load necessary portions into your testing context.
- And finally, use
@SpringBootTestwhen you want to test larger portions of your application that cannot be dealt with by any of the provided test slices. - Use Symflower to generate the boilerplate code for your tests, be it plain unit tests or any of the Spring Boot tests mentioned in this post. Symflower will automatically figure out which test slice to use and will add the required auto-wiring and mocks. All you need to do is to type in the right values for your test scenario.